Monday, October 7, 2013

Roasted Potato Slices with Smoky Dip

This recipe is easier than it seems (or maybe it just seemed complicated to me because there was a dip involved and I was thinking "ain't nobody got time for that!" but then I did...) and it turned out so good! Like always, I modified the recipe a little bit which is the one listed below! We ate these with dinner but they'd be a really good snack or party appetizer too! This recipe serves 3 people as a side dish. 


Ingredients
  • 4 medium potatoes
  • 1/3 cup of sour cream (I used vegan sour cream)
  • 1/3 cup of mayo (I used light mayo)
  • 3 tablespoons olive oil
  • 3 sprinkles of salt (yes this is my new measuring system for spices haha)
  • 2 sprinkles of pepper
  •  teeny-tiny sprinkle of cayenne pepper (if you want them a little spicy)
  • sprinkle of cumin*
  • sprinkle of chili powder*
  • sprinkle of garlic powder*
  • sprinkle of onion powder*
  • Sprinkle of paprika*
potato slices pre-roasting
*if you don't have one of these its not the end of the world you should still make your dip, it'll still be really good, I promise
Steps for Potato Slices
  1. Preheat oven to 400 degrees
  2. Wash and scrub potatoes
  3. Slice potatoes into 1/4" slices (don't get anal about this, noone really cares that much)
  4. Put slices in a bowl, drizzle olive oil on top then add salt and pepper and cayenne pepper
  5. Mix it all together with your (well-washed) hands making sure each slice is coated in oil
  6. Lay slices on a roasting pan (I had to use two pans and covered them in foil for easy cleanup) making sure slices don't overlap (this is really important if you don't want them soggy)
  7. Roast for 15 minutes then turn pan around in oven and roast for 10 more minutes (no need to flip slices)
  8. Some slices might get burned and some slices will be perfect, that's life but I like the burned ones, if you don't have a person in your house who likes the burned things, you should get one ASAP it makes you feel better about burning thing. 
Steps for Smoky Dip
  1. Combine sour cream, mayo, cumin, chili powder, paprika, garlic powder, and onion powder, mix well and store in fridge until potato slices are done.


Easy Applesauce (crockpot)

The boy and I went apple picking a couple weekends ago and since then I have been making apple everything (lots of the recipes will be on this site). Apple cake, apple muffins, apple sauce, apple butter. Here is the easiest, tastiest homemade applesauce I've made and I've tried out three different ones.
apples in crockpot

Ingredients
  •  3-5 apples, cut up (about 1 inch chunks or larger if you plan on blending the applesauce). Peel the apples if you don't plan on blending because the peels can be a weird texture. If you blend the applesauce after cooking the peels won't be an issues.
  • 1 tablespoon lemon juice
  • 1 teaspoon cinnamon
  • 1-2 tablespoons of agave or honey (if you want it sweetened)
 Steps: 
  1. Place all ingredients in crockpot
  2. Cook on low for 8 hours or high for 4 hours (if you cook it on high add 1/2 cup water)
  3. Put in blender and blend or just leave it if you like chunkier apple sauce

Lemon-Pepper Oven Baked PorkChops

So I have been trying to figure out how to make pork chops for a very long time. Yes you can shake n bake them or pan fry them or even bake them but mine always turn out rubbery and tough. Bleck. However the other day the boy came home from dinner at a friend's house and started bragging about the pork chops his friend made. The secret? Wrap them in tinfoil when you bake them in the oven! Weird but I tried it last night and success, they were so tender and the lemon-pepper wasn't overly strong at all like it sometimes is with chicken.

Ingredients
  • 2 pork chops (preferably with the bone)
  • roll of tinfoil
  • lemon pepper
  • Worcestershire sauce
  • butter (or olive oil, or vegan butter)
Steps
  1. Preheat oven to 400 degrees
  2. Tear off 2 large chunks of tinfoil (enough to wrap up each chop completely)
  3. Place 1 tbsp butter (or in my case vegan butter) in center of tinfoil
  4. On a seperate plate generously sprinkle both sides of your pork chops in lemon pepper
  5. Place chops on top of butter in tinfoil
  6. Put 1 tbsp butter on top of chop
  7. Put 1 tsp Worcestershire sauce on top of chop as well
  8. Wrap up tightly in foil
  9. Cook in oven for 35 minutes!
  10. Enjoy!

Apple Crisp Muffins (GF/DF)

After two batches of applesauce, 1 batch of dried apple rings, and 1 apple cake I still had leftover apples from our visit to the orchard!! So I decided to make apple muffins :) The crisp topping on these is what made them stand out. I didn't come up with this recipe at all, but I did substitute gluten-free flour mix and earthbalance vegan butter for the butter in it and the muffins still turned out delicious! However I did end up baking them for like 15 minutes longer than the recipe calls for not sure if it was my oven or what but it might be something that's good to know!

Recipe

yum

Tuesday, September 17, 2013

Hummus Crusted Chicken

This recipe is at the top for this blog. It fills all of my criteria so perfectly.

It's...
1. healthy
2. cheap
3. easy
4. fast
5. delicious
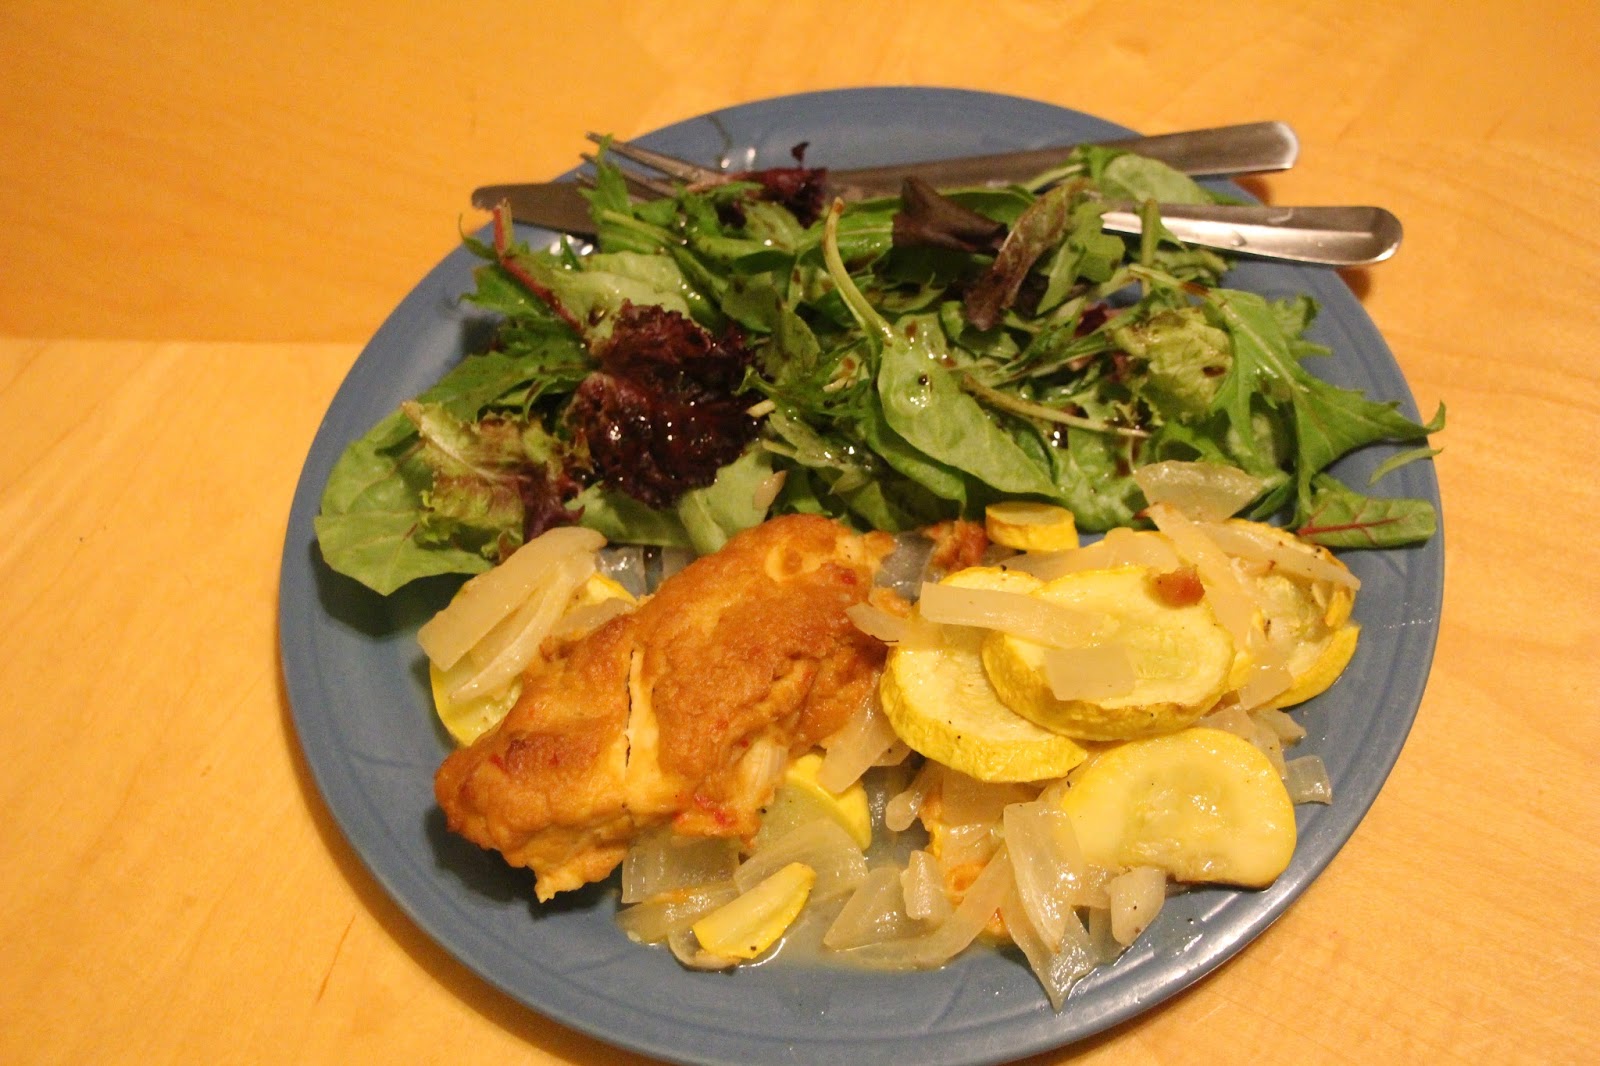
Without further ado I present hummus crusted chicken. you're welcome. this recipe serves 2 but you can obviously make it for way more people. As an extra bonus I sliced squash and onions and cooked them under my chicken breast in the dish. I love when the sides and the meat can be made together cause I'm lazy like that.

Ingredients
  • about 6 tablespoons of hummus ( I love red pepper hummus from sabra)
  • 2 chicken breasts
  • salt and pepper, to taste
  • 1 lemon or 4 tsps of lemon juice
Steps
  1. Preheat oven to 450 degrees
  2. coat a baking dish with cooking spray or olive oil
  3. place chicken breasts in baking dish, and sprinkle with salt and pepper
  4. smooth hummus on to the top of each chicken breast (!!don't contaminate your hummus with raw chicken by using it straight from the container!!) I've done it thick and thin and both is good but at least do it thick enough so that you can't see the chicken breast through the hummus.
  5. squeeze half a lemon over each breast
  6. Bake for 30 minutes until chicken is cooked through.
  7. Enjoy!
after cooking! i could've spread my hummus prettier but no one at my house cares

Sunday, August 18, 2013

Peach Crisp (GF/DF)

   I love peaches so living in Georgia is awesome during peach season...which is now, so I'm about to post a couple of my favorite peach recipes; although my favorite way to eat them is plain. Peach cider is amazing too (I like drinking it with champagne (bellini much?) or with Bacardi Razz rum. However, this peach crisp is delicious. It's gluten and dairy-free too!


Ingredients


Peach filling:
  • 6 peaches
  • 1 tbsp gluten free flour mix
  • 2 tbsp agave
  • 1 1/2 tsp cornstarch
  • 1 tsp cinammon
  • 1/2 tsp nutmeg
  • 2 tsp lemon juice
  • 1/2 tsp vanilla extract
Crisp topping:
  • 6 crumbled gluten/dairy free sugar cookies- not chewy (Enjoy Life or Lucy's are great)
  • 1/2 C of rolled oats
  • 3 tbsp gluten free flour
  • 1/4 C brown sugar
  • 1/4 tsp salt
  • 4 tbsp of dairy free spread (Earth Balance) or butter
Steps:
  1. Preheat oven to 425 degrees.
  2. Peel and thinly slice peaches. The easiest way to peel peaches is by putting them in a pot of boiling water then plunging them in ice water after a minute. The skins should just rub off.
  3.  Mix all crisp topping ingredients in a bowl then use a pastry knife to cut butter into the mix. If you don't have a pastry knife (I don't) use two knives to cut butter in bowl alternating directions until it's in tiny clumps. For an example see this youtube video. You're welcome. 
  4. Mix all peach filling ingredients together in a separate bowl. Pour into a small baking dish (I used a square 9x9)
  5. Cook peaches in over for 10 minutes, remove, and pour crisp topping on top covering completely. Bake in the oven for 30 minutes or until brown. 
  6. ENJOY! I served mine with coconut vanilla ice cream. Store leftovers in fridge :) Enjoy again!

Thursday, August 15, 2013

Easy Banana Muffins! (GF/DF)

So today I was going to finally use those overripe bananas that I've been storing in the freezer to make banana bread. Then I realized, I don't have a bread loaf pan...so I decided to make banana muffins! Some people know this (but my blog is for the beginner!) but overripe bananas are the best to use for baked goods. When your bananas get too ripe to eat (the outsides black) but they're not rotten, throw them in the freezer and defrost them for your next banana bread or in this case banana muffins! They turned out pretty good. I did mine the gluten-free and vegan way but that's because we ran out of eggs (but not flax powder go figure haha this is my life now) and I can't eat dairy or gluten. If you don't do it gluten free or vegan, use an egg instead of the "flax egg", and use normal flour in place of the gluten-free all purpose flour. So easy either way! Which is just the way I like my muffins. The nice thing about this recipe is it's so flexible you can just keep adding ingredients (cinnamon, raisins, chocolate chips, yogurt chips, etc!)
I forgot to take a picture so this one will have to do

Ingredients:
  • 1 1/2 c all-purpose flour or gluten free flour blend
  • 3/4 c sugar
  • 1 tsp baking soda
  • 1/2 tsp salt
  • 1 tsp cinnamon
  • 1 cup chopped nuts OPTIONAL (I used walnuts)
  • 3 ripe bananas (if you're bananas were frozen or not extremely over ripe, pop them in the microwave for a bit so you can easily mash them)
  • 1 "flax egg" or 1 egg ***
  • 1/3 c vegetable oil
  • 1 teaspoon vanilla extract
***you can make an easy and healthy substitute for eggs in baking. For substituting one egg- take 1 tbsp of ground flax powder (if you have flax seeds you can put them in a food processor to grind them up yourself) then ADD 3 tbsp of water (the water HAS to come 2nd). Mix then set in fridge for 15 minutes until consistency is thick and somewhat...well...egg-like.


 Steps:
  1. Preheat oven to 375
  2. In a large bowl mix all dry ingredients together. In a separate bowl mash bananas then add remaining wet ingredients. Add dry ingredients to the bowl of wet ingredients and mix well.
  3. Spoon into muffin cups filling about 1/2-3/4 of the way full.
  4. Bake in the oven for 18-22 minutes or until a toothpick comes out clean. 
  5. Enjoy!